PrecisionOS Start Guide
How to install and use the PrecisionOS platform on your Meta Quest headset.
Before you start
Before going through this guide, please complete or confirm the following:
- You have a Meta account and we have assigned the PrecisionOS apps to your account.
- Your headset and both controllers are charged.
- You have an active wireless internet connection.
- You have an obstruction-free area for VR (6.5ft x 6.5ft recommended).
1. Power up the headset and activate the controllers
Press the Power button for 2-3 seconds, until you see the Oculus logo inside the headset.

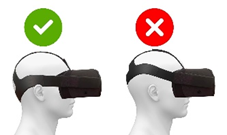
Pull and position the headset until it sits comfortably, and the side straps cradle the ears. You may need to manually adjust the Velcro straps.

Hold the controllers in pistol-grip with your index fingers on the Trigger buttons (circled). Pull either Trigger buttons to interact with elements in VR.

Note: The Meta Home button above is on the right-hand controller only and is used to open the Meta dashboard anywhere in VR; use this to pause the app and access the device settings, quit the app, start a cast/stream, take screenshots/videos, etc.
2. Create a "guardian" boundary
Follow the in-display instructions to calibrate the floor height and define a safe play area; “room-scale” is recommended for a more immersive experience. Watch this instructional video if you need help with setting up your guardian.
3. Connect to Wi-Fi
Press the Meta Home button on your right controller and select Quick settings on your toolbar, then select the Wi-Fi icon. Aim your cursor at the network list and use the thumbstick on the controller to scroll up and down; select your network and enter your password, then select “Go”.

4. Install the PrecisionOS apps
If you did not receive your Meta Quest directly from us, you will need to install the apps yourself. On the Meta toolbar, select the Apps Library (icon shown below), then change the dropdown filter in the corner to “Not Installed” to see only apps waiting to be installed. Select each PrecisionOS app with the trigger button to install, starting with the app called "PrecisionOS Platform Launcher".

Apps Library
5. Open the PrecisionOS Platform Launcher app
While still in the Apps Library from the previous step, change the same dropdown filter back to “All” or "Installed" to see the newly added apps. Using the thumbstick to scroll up and down if needed, locate the “Platform Launcher” app and select it with the trigger button to start it.

*For users who purchased a BodyworksTM subscription, there is no requirement to use the Launcher. Simply launch the BodyworksTM app to Login
6. Create a PrecisionOS account and log in
To create a PrecisionOS account, open your web browser on your phone or computer, visit the PrecisionOS dashboard and follow the instructions. Read this article if you need additional help.
Next, put your Oculus Quest back on. In the PrecisionOS Platform Launcher app, click on "Add" to add an account and pair your PrecisionOS account to your headset using the pairing code given to you when you created an account. Read this article if you need additional help.
7. Explore the procedures
After logging in, you can select any installed procedure by simply reaching out and selecting it from the board in front of you. Then, when in the virtual O.R., you can follow the written and spoken instructions from the virtual assistant to complete the procedure.